What this guide covers
- Full materials list and cut list for a 60″ media console
- How to rout the tambour door tracks correctly
- Building and backing the tambour door slats
- Assembling the cabinet carcase with pocket hole joinery
- Building and attaching the tapered leg base
- Finishing with hardwax oil for a close-to-the-wood luxe result
⏱ Difficulty: Intermediate–Advanced · Time: 2–3 weekends · Cost: $250–$400
| Project Details | Information |
| Time Required | 2-3 Weekends |
| Estimated Cost | $250 – $400 (Varies by hardwood choice) |
| Key Tools | Table Saw, Router, Drill, Pocket Hole Jig |
| Difficulty Level | Intermediate–Advanced |
| Dimensions | 60″ W x 16″ D x 24″ H |
Table of Contents
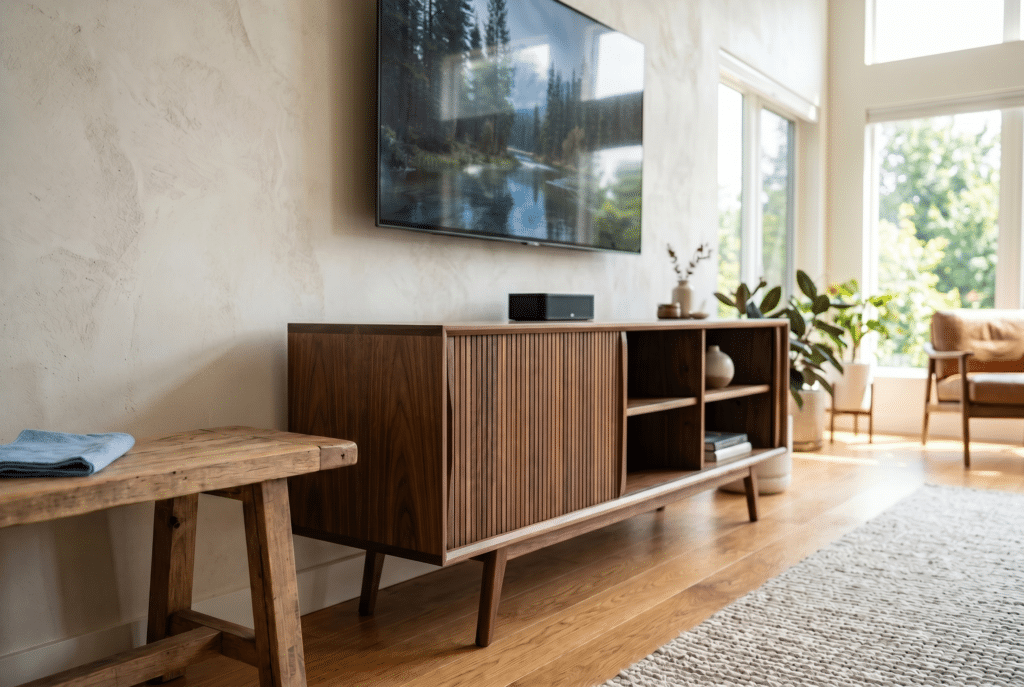
This DIY TV stand with tambour doors is one of the most striking furniture builds a home woodworker can tackle — a full media console with sliding tambour doors that looks like it came from a high-end furniture store, built entirely in your own shop for $250–$400.
The “organic luxe” aesthetic blends sleek contemporary lines with warm natural wood. The sliding tambour doors look incredibly complex but the mechanism is straightforward once you understand how it works. This guide breaks the build into clear, manageable steps using tools you likely already have.
There’s a quiet magic in taking a stack of rough, unyielding lumber from the big box store and coaxing it into a piece of fine furniture that transforms your living space. When you brush your hand over the grain, you aren’t just feeling wood; you are connecting with the soul of a living tree, giving it a second life in your home. Today, we are bringing that heritage craftsmanship into the modern era with this Organic Luxe TV Stand featuring sliding tambour doors.
The “organic luxe” aesthetic is all about blending sleek, contemporary lines with the warm, grounding textures of natural wood. Sliding tambour doors look incredibly complex and high-end, but I promise you, they are well within your reach. You don’t need a massive, climate-controlled workshop full of European machinery to pull this off. We are going to break this build down into clear, manageable steps using tools you likely already have. By the end of this project, you’ll have a stunning media console that hides your messy cables and acts as a jaw-dropping centerpiece for your home. Let’s make some sawdust!
The Shopping List
Everything you need to build this DIY TV stand with tambour doors is available at your local big-box home center or lumberyard. To keep the budget reasonable while still achieving that high-end look, we’ll use hardwood plywood for the main cabinet and solid hardwood for the high-touch areas like the doors and base.
Materials:
- (2) 4×8 Sheets of 3/4″ Walnut or White Oak Hardwood Plywood
- (1) 2×4 Sheet of 1/4″ MDF (for creating your router template)
- (15) Board Feet of 4/4 Solid Walnut or White Oak (for base, trim, and tambour slats)
- (2) Yards of Heavy-weight Canvas Cloth (for the tambour backing)
- 1 Roll of Iron-on Edge Banding (matching your plywood species)
- 1 1/4″ Pocket Hole Screws
- Quality PVA Wood Glue (e.g., Titebond II)
- Flexible Fabric Glue (vital for the tambour doors)
- Pre-Stain Wood Conditioner
- Hardwax Oil Finish (e.g., Rubio Monocoat or Osmo) or Wipe-on Polyurethane
- Furniture Paste Wax (for track lubrication)
Tools:
- Table Saw with a 60-tooth crosscut blade
- Plunge Router
- 1/4″ Spiral Upcut Router Bit
- Pocket Hole Jig
- Random Orbital Sander with 120, 180, and 220 grit discs
- Edge Banding Trimmer or Sharp Chisel
- Parallel Bar Clamps (at least four 36″ clamps)
The Cut List
Note: These measurements will build a 60-inch wide console, perfectly scaled to support up to a 65-inch television. Always measure and verify your space before cutting.
3/4″ Plywood Carcase:
- Top & Bottom Panels: (2) 15 1/4″ x 60″
- Outer Side Panels: (2) 15 1/4″ x 16″
- Center Vertical Dividers: (2) 14 1/2″ x 16″
Solid Wood Parts (Milled to 3/4″ thick):
- Tambour Slats: (65) 3/4″ wide x 1/2″ thick x 15 3/4″ long
- Base Aprons (Front/Back): (2) 3/4″ x 2″ x 54″
- Base Aprons (Sides): (2) 3/4″ x 2″ x 12″
- Legs: (4) 1 1/2″ x 1 1/2″ x 6″ (Tapered to 1″ at the floor)
The Step-by-Step Build
Step 1: Prepping and Banding the Carcase
Begin by breaking down your 3/4″ plywood sheets into the manageable dimensions listed in the cut list. Once your panels are sized, you need to conceal the raw plywood edges to give the illusion of solid wood. Apply your iron-on edge banding to the front-facing edges of the top, bottom, sides, and divider panels. Once adhered and cooled, use an edge banding trimmer or a sharp chisel to flush the banding up with the plywood faces, then give it a light sanding to soften the sharp corners.
When engineering cabinet cases, the decision to use high-grade hardwood plywood rather than solid, glued-up wood panels is rooted in dimensional stability and moisture mechanics. Solid wood is highly hygroscopic; it absorbs and releases ambient moisture, expanding and contracting tangentially and radially across its grain. If we built a 60-inch wide, closed box out of solid walnut, seasonal humidity changes would induce tremendous cross-grain expansion, potentially blowing out the corner joinery.
Plywood mitigates this entirely. By laying thin wood veneers with alternating grain directions (cross-plying), the expansive forces of each layer are physically constrained by the perpendicular layer beneath it. This structural equilibrium results in a panel that remains dead flat and dimensionally inert throughout the year, making it the perfect substrate for precision joinery.
Step 2: Routing the Tambour Tracks — the heart of every DIY TV stand with tambour doors
Before assembling the cabinet box, you must rout the grooves that the tambour doors will slide within. Cut a template from your 1/4″ MDF that mimics the exact path of the door—a straight line across the front, a gentle 2-inch radius curve at the corner, and a straight return line along the back to hide the doors when opened. Clamp this template to the inside face of your top panel. Using your plunge router with a template guide bushing and a 1/4″ spiral upcut bit, rout a 5/16″ deep groove. Repeat this exact process on the inside face of the bottom panel, ensuring the tracks are perfectly mirrored.
Successfully routing closed-channel tracks requires specific attention to router bit geometry and chip evacuation physics. We specify a spiral upcut bit rather than a standard straight-flute bit for a critical reason: the auger-like design of the upcut flutes actively pulls wood chips and heat up and out of the plunge cut. A standard straight bit in a confined, 5/16-inch deep groove will repeatedly chop the same waste material, generating excessive friction.
This heat can scorch the wood, dull the carbide edge prematurely, and alter the precise tolerance of the track. Furthermore, the 1/4″ width of the track paired with our 1/2″ thick tambour slats (which have rabbeted ends to fit the track) creates a necessary mechanical tolerance. Leaving exactly 1/16″ of clearance prevents the friction coefficient from spiking when the wood inevitably takes on slight ambient moisture, preventing the doors from seizing.
Step 3: Assembling the Cabinet Box
This DIY TV stand with tambour doors uses pocket hole joinery for the cabinet carcass. With your tracks routed, drill pocket holes on the undersides of the bottom panel (to attach to the sides and dividers) and the inside faces of the top side panels. Apply a consistent bead of PVA wood glue to the mating edges. Drive your 1 1/4″ pocket hole screws to draw the joints tightly together. Use a framing square to ensure every corner is exactly 90 degrees as you assemble the box. Clamp the assembly to keep pressure uniform while the glue sets.
Pocket hole joinery often receives criticism from purists, but when properly applied in plywood cabinetry, it creates a highly robust joint due to the nature of modern PVA (polyvinyl acetate) wood glue. Plywood edges are notoriously porous because they expose alternating layers of end-grain, which act like microscopic straws that wick glue away from the joint line, causing “glue starvation.” Pocket hole screws solve this by providing immense, localized compressive clamping force.
This tight mechanical fastening holds the joint perfectly immobile while the water in the PVA glue evaporates, allowing the long-chain polymer molecules to deeply cross-link and mechanically interlock with the wood’s cellular structure, creating a composite bond that is actually stronger than the surrounding wood fibers.
Step 4: Crafting the Tambour Doors
The tambour doors are what set this DIY TV stand with tambour doors apart from any standard media console. Rip your solid wood into 65 individual slats on the table saw, ensuring they are exactly 3/4″ wide and 1/2″ thick. Sand every face of these slats up to 220 grit now—you cannot sand them effectively once they are glued to the canvas. Lay the slats face down on your workbench, pushed tightly together, ensuring the tops and bottoms are perfectly flush against a straight edge.
Cut your canvas backing, leaving a 1-inch border at the top and bottom so the fabric doesn’t interfere with the router tracks. Apply an even, generous coat of flexible fabric glue to the canvas and press it firmly onto the back of the slats. Weigh the entire assembly down with books or scrap wood and let it cure for 24 hours.
The mechanical function of a sliding tambour door relies entirely on elastomeric flexibility. Standard PVA wood glues dry into a hard, crystalline structure to provide rigidity. If you were to use PVA or epoxy to laminate the canvas backing to the wood slats, the repeated mechanical stress of bending the door around the track’s 2-inch radius would cause catastrophic shear failure. The brittle glue lines would simply fracture and delaminate. By utilizing a specialized, latex- or silicone-based fabric adhesive, we create a bond with high tensile elasticity. The adhesive layer deforms and stretches under the mechanical load of the curve, safely absorbing the shear stress without severing the bond between the wood fibers and the canvas weave.
Step 5: Building and Attaching the Base
Mill your solid wood aprons and cut your four legs. To give it that mid-century modern, organic lift, cut a slight taper on the two inside faces of each leg. Assemble the base using pocket holes or dowels. Before attaching the solid wood base to the plywood cabinet, drill slightly oversized (elongated) holes through the base aprons. Drive your screws through these oversized holes, using washers, up into the bottom of the plywood cabinet.
Attaching a solid wood base framework to a dimensionally stable plywood carcase creates a structural conflict known as cross-grain constraint. As the seasons change and indoor humidity drops during winter heating, the solid wood aprons will attempt to shrink across their width. If they are rigidly glued or tightly screwed directly to the immovable plywood, the plywood will act as a physical constraint.
The resulting tensile stress will eventually exceed the shear strength of the solid wood, causing the base aprons to violently crack and split. By utilizing elongated screw holes and washers, we engineer a floating mechanical connection. The base is held securely downward against gravity, but the screws are free to slide laterally within the oversized holes, harmlessly dissipating the kinetic energy of seasonal wood movement.
The Heritage Touch
This is the step that truly elevates your DIY TV stand with tambour doors from flat-pack quality to heirloom quality.
Before you reach for the finish, take a moment to unplug. Power tools are incredibly efficient at dimensioning lumber, but they leave behind a bruised, battered cellular surface. Take your freshly assembled solid wood base and secure it to your bench. Reach for a finely tuned No. 4 smoothing plane or a freshly burnished cabinet scraper.
Take a whisper-thin shaving along the length of the solid wood. Listen to the sound—a crisp, satisfying snik as the steel cleanly severs the wood fibers. Sandpaper acts as an abrasive, crushing the wood and filling the pores with dust, which dulls the final appearance. A sharp hand tool slices the grain cleanly, leaving behind a burnished, glass-like surface that catches the light and reveals the true, three-dimensional chatoyancy of the wood. There is a deep, quiet satisfaction in this process. You are no longer just a manufacturer; your hands are having a dialogue with the material. This traditional refinement is what separates a sterile, factory-made box from a piece of heirloom furniture infused with the care and spirit of the craftsperson.
Finishing & Protection
The “luxe” part of Organic Luxe comes down to the finish. We want to avoid heavy, plastic-like polyurethane films that bury the wood. This is the step that truly elevates your DIY TV stand with tambour doors from flat-pack quality to heirloom quality.
- Preparation is Everything: Ensure all surfaces are sanded uniformly to 220 grit. If you used pine or another soft wood for your solid accents, apply a Pre-Stain Wood Conditioner to prevent blotchy color absorption.
- Applying the Finish: I highly recommend a hardwax oil finish for this project. It bonds molecularly with the wood fibers, leaving a gorgeous, matte, close-to-the-wood feel that is highly water-resistant. Pour a small amount onto the surface and buff it in with a white Scotch-Brite pad. For a complete guide to wood finishing options at every budget, read our guide to Understanding Wood Grain and surface preparation.
- The Golden Rule: Wipe off all excess finish. If the wood looks wet, you need to keep buffing with a clean, lint-free rag. Let it cure in a well-ventilated space.
- Track Lubrication: Never put liquid finish inside your tambour tracks. Instead, once the cabinet is finished and cured, take a clean rag and heavily apply Furniture Paste Wax inside the routed grooves and along the rabbeted edges of your doors. This acts as a dry lubricant, ensuring your doors slide smoothly for decades.
Frequently Asked Questions
How do I prevent my sliding tambour doors from sticking over time? Sticking tambour doors are usually caused by tight tolerances and a lack of lubrication. Ensure your routed track is at least 1/16″ wider than the thickness of your door’s sliding edge. Never apply paint or polyurethane inside the tracks, as they will get gummy. Instead, apply a generous layer of clear furniture paste wax into the grooves and onto the edges of the doors, reapplying once a year to keep the mechanism gliding effortlessly.
Can I build this TV stand using dimensional pine from a big box store? Yes, you can build this with pine, but it requires patience. Dimensional pine from big box stores often has a high moisture content and is prone to warping. Buy the pine several weeks in advance, stack it in your house with small spacers (stickers) between the boards, and let it acclimate to your home’s humidity before cutting. Always use a pre-stain wood conditioner before finishing pine to achieve an even, professional look.
Will a 60-inch TV stand safely support a 65-inch or larger television? Absolutely. Modern flat-screen TVs are relatively lightweight. The structural integrity of a 3/4″ hardwood plywood carcase, supported by a solid wood base and reinforced by center vertical dividers, is incredibly strong. It will easily support the weight of large televisions and heavy audio receivers without any center sag.
Final Thoughts & Next Steps
I know that looking at a project with terms like “plunge routing” and “tambour tracks” can feel a little overwhelming, especially if you are relatively new to the hobby. But let me tell you a secret: every single expert woodworker started out exactly where you are right now. You don’t need to be perfect; you just need to start. Take it one step at a time, double-check your measurements, and don’t be afraid to make a mistake. If you cut a board too short, it’s just wood—toss it in the scrap pile, grab another piece, and try again!
The feeling of pride you are going to experience when you slide those gorgeous tambour doors shut for the very first time, perfectly hiding your media gear inside a piece of furniture you built with your own two hands, is completely unmatched. You can do this! Once your DIY TV stand with tambour doors is complete and the finish has cured, you’ll have a piece of furniture that genuinely looks like it cost ten times what the materials did.
Once you wrap up this console, keep the momentum going! Check out our guide on Easy DIY Farmhouse Outdoor Coffee Table Plans to build a perfectly matched living room set. Get out to the shop, be safe, and have fun making some sawdust!
If you’re looking for more project plans at every skill level, browse our full Woodworking Plans Library.
References
For those looking to dive deeper into the science, mechanics, and heritage of woodworking techniques mentioned in this build, consider adding these essential texts to your shop library:
- “Understanding Wood: A Craftsman’s Guide to Wood Technology” by R. Bruce Hoadley. (The definitive guide on wood movement, moisture, and structural physics).
- “The Complete Manual of Woodworking” by Albert Jackson, David Day, and Simon Jennings. (Excellent visual guides on routing templates, jigs, and basic joinery).
- “Essential Woodworking Hand Tools” by Paul Sellers. (A masterclass on the philosophy, tuning, and daily use of traditional hand tools).