
| Project Summary | Details |
| Time Required | 1 Weekend |
| Estimated Cost | $150 – $250 |
| Tools Required | Miter Saw, Drill, Pocket Hole Jig, Sander |
| Difficulty | Intermediate |
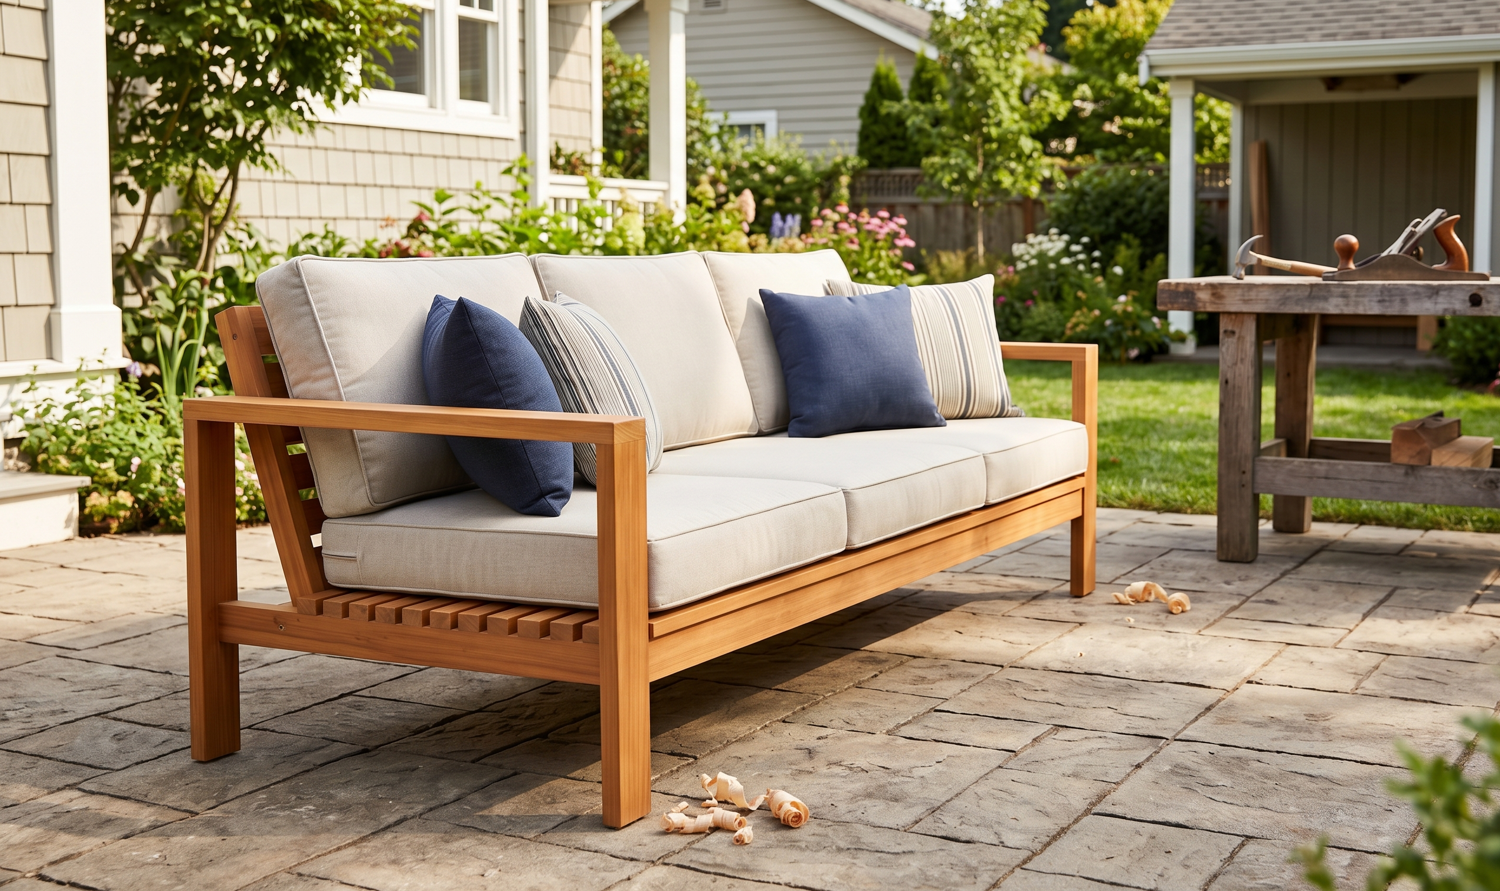
Wood is more than just a building material; it is a living, breathing testament to nature’s engineering. When you build your own furniture, you tap into a rich heritage of craftsmanship, shaping raw timber into a lasting gathering place for friends and family. Here at Popular Woodworking Plans, we believe that high-end outdoor furniture shouldn’t be locked behind a prohibitive designer price tag. This DIY slatted outdoor sofa is designed to be completely approachable, bringing high-end catalog style right to your backyard.
You don’t need a massive commercial workshop or decades of traditional joinery experience to tackle this project. If you can measure accurately, make a straight cut on a miter saw, and drive a screw, you can build this sofa. We are combining straightforward, accessible construction methods with robust structural engineering to give you a piece that will look beautiful and endure the elements for years. Let’s get some sawdust on our boots, fire up the tools, and make something incredible.
The Shopping List
To keep this build accessible, all lumber is based on standard US sizing and is readily available at your local big-box home improvement store (like The Home Depot or Lowe’s). For outdoor furniture, Western Red Cedar or pressure-treated pine are your best economical options.
Lumber Requirements:
- (4) 2×4 @ 8ft – For the legs, armrests, and back supports.
- (4) 2×6 @ 8ft – For the front apron, back apron, and side supports.
- (8) 1×4 @ 8ft – For the seat slats and backrest slats.
- (2) 2×2 @ 8ft – For the inner seat cleats.
Tools & Hardware:
- 10-inch Compound Miter Saw
- 18V Cordless Drill/Driver Combo
- Pocket Hole Jig (Kreg Jig K4 or 720Pro)
- Random Orbital Sander (5-inch)
- 2 1/2-inch Exterior Pocket Hole Screws (Blue-Kote)
- 1 1/4-inch Exterior Wood Screws (Deck Screws)
- Waterproof Exterior Wood Glue (Titebond III)
- 120-grit and 220-grit Sanding Discs
- Bar Clamps (24-inch minimum)
The Cut List
Take your time at the miter saw. Accurate cuts are the foundation of a square, wobble-free sofa. Remember the old adage: measure twice, cut once.
From the 2x4s (Legs & Arms):
- (4) Front/Rear Legs: 23 1/4″
- (2) Armrests: 33 1/2″
- (3) Backrest Vertical Supports: 20 1/2″ (Cut with a 15-degree angle on the bottom end)
From the 2x6s (Frame Aprons):
- (2) Front & Rear Aprons: 72″
- (2) Side Aprons: 28 1/2″
- (1) Center Support: 28 1/2″
From the 2x2s (Cleats):
- (2) Side Cleats: 28 1/2″
- (2) Front & Rear Cleats: 69″
From the 1x4s (Slats):
- (14) Seat Slats: 28 1/2″
- (6) Backrest Horizontal Slats: 72″
The Step-by-Step Build
Step 1: Assembling the Side Frames (Armrests & Legs)
Begin by constructing the two identical side frames. Lay out two of your 23 1/4″ 2×4 legs and one 28 1/2″ 2×6 side apron. Drill 1 1/2″ pocket holes into the ends of the side apron. Position the apron 10 inches up from the bottom of the legs to create the leg clearance. Apply a generous bead of waterproof exterior glue to the ends of the apron, clamp it flush to the inside edges of the legs, and drive your 2 1/2″ exterior pocket hole screws. Top the frame with the 33 1/2″ 2×4 armrest, securing it from underneath with 2 1/2″ screws.
To truly understand why we orient the leg components in this specific manner, we have to look at the microscopic structure of the softwood you brought home from the lumberyard. Softwoods like pine and cedar are primarily composed of long, hollow cells called tracheids, which you can visualize as a tightly bound bundle of drinking straws. When force is applied parallel to the grain—such as the vertical, downward force of a person sitting heavily on the sofa armrest—these “straws” exhibit incredible compression strength, transferring the load directly into the ground without buckling. However, if we were to turn these 2x4s horizontally, applying force perpendicular to the grain, we would easily crush those hollow tubes, compromising the structural integrity of the frame over time. Furthermore, by relying on vertical orientation, the shear stress exerted on the mechanical fasteners is significantly reduced. The wood itself is bearing the primary dynamic load rather than the steel screws, ensuring the joints won’t loosen or wallow out over years of seasonal use and fluctuating weights.
Step 2: Joining the Aprons and Support Structure
With your two side frames fully assembled, it is time to connect them using the 72″ 2×6 front and rear aprons. Drill pocket holes into the ends of both long aprons. Stand the side frames up (you may need an extra set of hands here) and clamp the front apron flush with the side aprons. Glue and drive your 2 1/2″ screws. Repeat for the rear apron. Finally, install the 2×6 center support directly in the middle of the frame (36″ from either side) to prevent the long span from sagging.
A sofa frame must be engineered to resist dynamic lateral loads, commonly referred to in woodworking and engineering as “racking forces.” When a user drops onto the seat and shifts their weight sideways, the 90-degree corners of your frame essentially act as fulcrums. If these joints are weak, the entire structure will fold like a house of cards. Pocket screw joinery is often dismissed by purists, but it is mechanically superb for this application when combined with high-quality glue. The angled screw acts as a localized, high-pressure clamping mechanism that pulls the end grain tightly against the face grain. While the steel screw provides initial mechanical tension, the waterproof PVA glue permeates the porous cellular structure of the wood. Once cured, the polymers in the glue cross-link with the wood fibers, creating a bond where the adhesive shear resistance is actually stronger than the lignin holding the wood fibers together.
Step 3: Installing the Seat Cleats and Slats
Take your 2×2 cleats and attach them to the inside faces of the front, rear, and side aprons. These should be mounted 3/4″ down from the top edge of the aprons to allow the 1×4 seat slats to sit perfectly flush with the frame. Secure the cleats using wood glue and 2 1/2″ exterior screws driven every 8 inches. Once the cleats are set, begin laying out your fourteen 1×4 seat slats front-to-back. Use a 1/4″ spacer block between each slat to ensure uniform gaps, then screw them down into the cleats using 1 1/4″ deck screws.
Wood is an anisotropic, hygroscopic material, meaning it behaves like a rigid sponge that constantly seeks moisture equilibrium with its surrounding environment. As ambient humidity rises during the damp spring and summer months, wood fibers absorb moisture and swell. This dimensional change does not happen equally in all directions; wood expands at a significantly higher rate tangentially (across the growth rings) than it does longitudinally (along its length). If we were to butt the 1×4 slats tightly against one another to create a solid seat, that seasonal tangential expansion would create immense compressive force. The wood would have nowhere to go, resulting in violent buckling that could sheer the heads right off your deck screws or split the aprons entirely. The mandatory 1/4-inch gap between the slats isn’t just an aesthetic design choice to allow rainwater to drain; it is a vital mechanical buffer that accommodates the maximum calculated tangential expansion for standard dimensional softwoods.
Step 4: Constructing the Angled Backrest
The backrest utilizes three vertical 2×4 supports cut at a 15-degree angle at their base. Space these evenly along the rear 2×6 apron (one on each end, one dead center). Secure them by driving 2 1/2″ screws through the back of the rear apron directly into the angled base of the supports, and reinforce them by driving screws down through the armrests into the outer supports. Once the vertical frame is rigid, attach your six 72″ 1×4 horizontal backrest slats across the front of the supports, starting from the top and working down, using a 1/2″ spacer between each slat.
Designing a comfortable backrest is an exercise in managing leverage and vector forces. An ergonomically sound backrest—typically angled between 10 and 15 degrees—provides lumbar comfort but introduces a complex bending moment to the structure. When a user leans back, their upper body weight creates a horizontal force vector pushing outward against the top of the backrest. The base of the vertical supports acts as a mechanical fulcrum, essentially turning the entire backrest into a massive lever that desperately wants to pry the rear apron apart. This places the lower joint under extreme tensile stress. By securing the bottom of the backrest directly into the robust 2×6 rear apron and tying the outer supports into the horizontal armrests, we distribute those shear and tensile stresses across multiple planes of the frame. This dispersion of kinetic energy prevents localized catastrophic failure and ensures the backrest will easily support the leveraged weight of multiple adults leaning back simultaneously.
Step 5: Final Assembly and Sanding Prep
Inspect all joints, ensuring screws are driven fully and any glue squeeze-out has been scraped away. Load your random orbital sander with a 120-grit disc. Begin sanding the entire piece, paying special attention to the armrests and the front edge of the seat slats where users’ legs will rest. Move the sander at a slow, steady pace of about one inch per second. Once the entire piece is sanded to 120-grit, do a quick pass over the end grain areas with 220-grit to prepare them for finishing.
Sanding is rarely understood as the microscopic machining process it actually is. Abrasives don’t just smooth the wood; they actively sever and level the cellular fibers on the surface. When preparing outdoor furniture for a film-building finish like spar urethane, stopping at 120-grit on the face grain is optimal. If you progress to ultra-fine grits like 220 or 320 on the faces, the frictional heat of the sander can melt the lignin in the wood, effectively burnishing the surface and clogging the open pores. This prevents your exterior finish from penetrating deeply to achieve the necessary mechanical key, leading to premature peeling and flaking. Conversely, the end grain acts like a bundle of open capillary tubes that rapidly wick in moisture and finish. By lightly polishing only the end grain to 220-grit, you intentionally crush and partially seal those capillary tubes, ensuring your stain and topcoat absorb evenly rather than turning muddy and oversaturated.
The Heritage Touch
While modern power tools dimension our lumber with ruthless efficiency, they often leave behind a sterile, machine-milled surface. To elevate this project from a standard weekend build to a piece of heirloom-quality craftsmanship, we must reintroduce the hand tool.
Take a well-tuned low-angle block plane or a #4 smoothing plane and ease every sharp 90-degree arris (edge) on the sofa. There is an intimate, tactile connection established when you feel the grain direction and listen to the distinct “swoosh” of a sharp iron taking a continuous, unbroken shaving. By chamfering the edges of the armrests and the seat slats by hand, you do more than just protect users from splinters. You create a faceted edge that catches the evening light beautifully, shedding rainwater more efficiently while granting the wood a softer, inviting, and inherently human touch that machines simply cannot replicate.
Finishing & Protection
Outdoor furniture faces a brutal gauntlet of ultraviolet radiation, torrential rain, and fluctuating temperatures. Unprotected wood will quickly suffer from lignin degradation, turning a silvery gray before succumbing to rot.
If you are using pine, you must begin with a high-quality pre-stain wood conditioner. Softwoods have uneven pore density, meaning they absorb pigment erratically, resulting in a blotchy, amateurish finish. The conditioner acts as a sizing agent, partially sealing the most porous areas to ensure your exterior oil-based stain applies evenly.
Once your stain has cured for 24 hours, apply three coats of an exterior-grade, UV-resistant spar urethane. Unlike standard indoor polyurethane, which cures to a hard, brittle plastic, spar urethane contains a higher ratio of oil to resin. This allows the cured film to remain flexible, expanding and contracting dynamically with the wood’s seasonal movement without cracking. Sand lightly with 220-grit between your topcoats to knock down any raised fibers or dust nibs.
Frequently Asked Questions
What is the best wood for an outdoor sofa? For DIY builders, Western Red Cedar is the gold standard due to its natural resistance to rot, decay, and insect damage. It is lightweight, dimensionally stable, and beautiful. Teak and White Oak are superior hardwoods for outdoor use, but they are significantly more expensive and harder to source at big-box stores. Pressure-treated pine is the most budget-friendly option, though it requires more diligent maintenance and finishing.
How do you protect a wooden sofa from rain? The first line of defense is construction: ensuring proper gaps between slats allows standing water to drain rather than pool. Chemically, the wood must be sealed completely (including the underside and the feet) with a marine-grade spar varnish or a penetrating exterior timber oil. Additionally, investing in a high-quality, breathable, waterproof patio furniture cover is the best way to extend the lifespan of your finish and the wood beneath it.
Can I use regular indoor cushions on an outdoor wood sofa? No. Indoor cushions use standard foam that acts like a sponge, retaining moisture that will quickly lead to mold, mildew, and rot—both in the cushion and in the wood slats beneath it. You must use specific outdoor cushions made from open-cell, reticulated foam wrapped in UV-resistant, water-repellent fabrics like Sunbrella.
Final Thoughts & Next Steps
Building your own patio furniture is one of the most rewarding ways to upgrade your outdoor living space. You’ve taken raw, dimensional lumber and engineered it into a comfortable, durable, and stunning slatted sofa. Take a step back, admire those clean lines, and be proud of the fact that you built this with your own two hands.
Don’t forget to save this project! Pin it directly to your Outdoor Woodworking | DIY Patio & Garden Plans board so you have the cut list handy when you head to the lumber yard.
Ready to complete your patio set? Once you’ve mastered this build, you have all the skills required to tackle the matching pieces. If you had fun with this build and want to upgrade your toolkit or find the exact hardware I used today, you can check out my recommended Woodworking Resource right here: Get Access Here
References
- Understanding Wood: A Craftsman’s Guide to Wood Technology by R. Bruce Hoadley. (Essential reading on wood movement and moisture).
- The Essential Woodworker by Robert Wearing. (For mastering the heritage hand-tool techniques mentioned above).
- Illustrated Cabinetmaking: How to Design and Construct Furniture That Works by Bill Hylton. (An excellent resource on the structural mechanics of joinery and racking forces).