What you’ll learn in this guide
- The essential starter toolkit for joinery
- 4 beginner joints that cover most basic projects
- 4 intermediate joints for stronger, more refined builds
- How to troubleshoot joints that don’t fit correctly
- Glue-up and clamping techniques that make or break a joint
- Common beginner mistakes — and how to avoid them
⏱ Reading time: about 8 minutes
Table of Contents
Why joinery matters more than you think
Joinery is the backbone of woodworking. Every piece of furniture, every cabinet, every frame you’ll ever build depends on joints — the connections between individual pieces of timber. A project with good joinery holds together for decades. A project with poor joinery fails at the worst possible moment.
Understanding joinery techniques for beginners isn’t just about knowing how to cut a mortise or drill a dowel hole. It’s about understanding why one joint works better than another for a given situation — so you can make good decisions at the design stage rather than discovering problems during assembly.
The eight joints in this guide cover the vast majority of what you’ll need for beginner and intermediate woodworking projects. Master these and you’ll have the foundation to tackle almost any build.
The essential starter toolkit for joinery
Before making any cuts, you need the right tools. For timber, pine is the recommended starting material — it’s affordable, widely available, and soft enough to be forgiving as you learn the techniques. Here’s what your beginner joinery toolkit should include:
| Category | Essential items |
|---|---|
| Cutting & shaping | Hand saw (fine-toothed), set of woodworking chisels |
| Measuring & marking | Tape measure, combination square, marking knife |
| Assembly | Wooden mallet or hammer, bar and C-clamps, high-quality wood glue |
| Safety gear | Safety glasses, ear protection, dust mask |
One item worth highlighting: the marking knife. Most beginners use a pencil for marking cut lines, but a marking knife is significantly more accurate. It severs the wood fibres and creates a physical groove for your saw or chisel to register against, which dramatically improves the precision of your cuts. It’s an inexpensive upgrade that makes an immediate difference.
Golden rules — safety and preparation for joinery
Before picking up any tool, get these four habits in place. They apply to every joinery technique for beginners and experienced woodworkers alike.
Keep your tools sharp
Sharp tools are safer than dull ones — this surprises most beginners, but it’s true. Dull blades require more force to cut, which causes the tool to slip unpredictably. A sharp chisel cuts where you direct it. A dull chisel goes where it wants. Sharpen your chisels and saw blades regularly and you’ll find joinery easier, cleaner, and safer.
Measure twice, cut once
The most common beginner joinery mistakes come from inaccurate measurements and hasty cuts. Double-check every measurement before cutting. Use a combination square to confirm angles are true. A few extra seconds of checking saves hours of corrective work.
Practice on scrap wood first
Always practice your cuts and joint alignments on offcuts before moving to your final project pieces. Scrap wood is free — use it generously. If a joint doesn’t fit well on the practice piece, it won’t fit well on the real thing either. Get it right on scrap first.
Keep your workspace tidy
A cluttered workspace causes accidents. Keep offcuts cleared away, tools returned to their places when not in use, and your work surface clear of everything except what you’re currently working on. Good habits at the bench develop quickly and pay dividends for every project you’ll ever build.
Level 1 — 4 beginner joinery techniques for a strong start
These four joinery techniques for beginners cover most of what you’ll need for basic boxes, frames, shelves, and furniture. Start here and build your confidence before moving to Level 2.
1. Butt joint

The butt joint is the simplest joint in woodworking. You join two pieces of wood together at their edges or ends — that’s it. No special cuts, no jigs, no complex setup. If you’re new to woodworking, this is where you start.
The limitation of a butt joint is strength — the end grain of timber doesn’t bond well with wood glue, and the joint relies heavily on mechanical fasteners to hold. Always reinforce butt joints with screws or nails in addition to glue. For non-structural applications like backing panels and simple boxes, butt joints are perfectly adequate.
Best for: simple boxes, backing panels, basic frames, practice builds.
2. Dowel joint
Dowel joints add internal strength without visible fasteners. You drill matching holes into both mating pieces, insert wooden dowels coated in glue, and clamp the joint closed. When the glue sets, the dowels create a strong, hidden bond that’s significantly stronger than a basic butt joint.
The critical skill here is alignment — the holes in both pieces must match up exactly. A dowel jig is an inexpensive tool that guides your drill bit to ensure consistent hole placement. Without one, alignment is difficult; with one, dowel joinery becomes straightforward and reliable.
Best for: shelving, simple furniture, edge-joining panels, face frames.
3. Biscuit joint
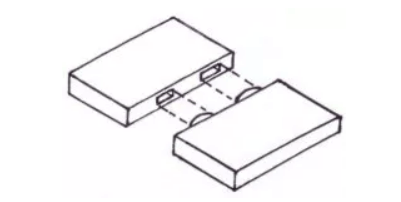
Biscuit joints are ideal for joining edges to create wide panels — tabletops, cabinet sides, and similar flat surfaces. A biscuit joiner (also called a plate joiner) cuts matching semi-circular slots into both pieces. You insert an oval-shaped wooden biscuit into the slots with glue, then clamp the joint closed.
The biscuit expands slightly with the moisture from the glue, creating a tight, locked fit. Biscuit joints don’t add a great deal of mechanical strength, but they excel at keeping glued-up panels aligned during clamping — which is their primary value. The joint ensures both faces stay flush while the glue dries.
Best for: edge-joining panels, tabletops, cabinet sides, wide shelves.
4. Half-lap joint

The half-lap joint steps up the complexity but delivers noticeably better strength, particularly for frames and grids. You remove exactly half the thickness of each piece where they overlap, creating a flush, flat surface when the two pieces mate together.
Precise chisel work is essential here — the recess needs to be flat and consistent across its full width. Sharpen your chisels before attempting this joint. Start by sawing the shoulder cuts to your marked depth, then remove the waste with a chisel, working in thin passes from both ends toward the middle.
Best for: door frames, window frames, furniture frames, grid structures.
Level 2 — 4 intermediate joinery techniques to elevate your builds
| Joint type | How it works | Best used for |
|---|---|---|
| Mortise & tenon | A square hole (mortise) is cut into one piece; a corresponding peg (tenon) is cut on the other to fit snugly inside | Heavy-duty furniture, structural frames, tables, chairs |
| Box/finger joints | A series of interlocking rectangular cuts that look like interlaced fingers, providing massive glue surface area | Boxes, drawers, decorative casework |
| Dovetail joints | Interlocking trapezoidal pins and tails — highly resistant to being pulled apart | Drawer construction, fine cabinetry, decorative joinery |
| Pocket hole joinery | An angled hole is drilled into one piece, allowing a screw to drive into the adjoining piece at an angle | Cabinet framing, hidden structural joints, fast assembly |
5. Mortise and tenon
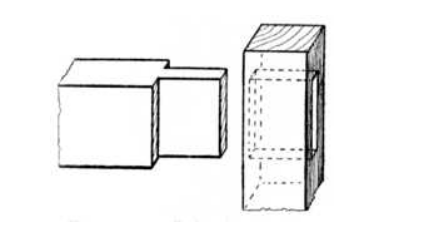
The mortise and tenon is the classic joint of traditional furniture making — used for centuries in chairs, tables, doors, and structural frames. A square or rectangular hole (the mortise) is cut into one piece, and a corresponding tongue (the tenon) is cut on the mating piece to fit snugly inside. When glued, the joint is exceptionally strong and resistant to racking forces.
Cutting a clean mortise and tenon requires careful measurement, sharp chisels, and patience. The tenon should fit snugly into the mortise — tight enough that you need light mallet taps to seat it fully, but not so tight that it splits the surrounding wood. Test the fit dry before applying any glue.
Best for: chair legs, table aprons, cabinet door frames, structural furniture joints.
6. Box and finger joints
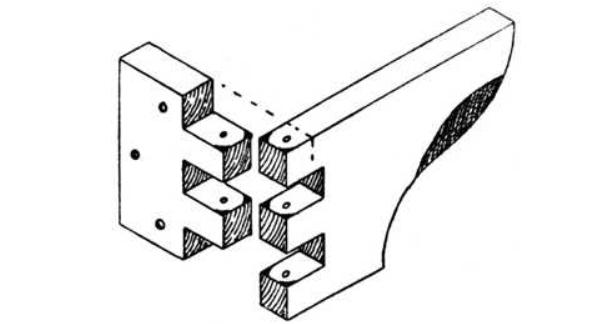
Box joints — also called finger joints — create an interlocking series of rectangular cuts that mesh together like interlaced fingers. The result is an enormous gluing surface area, making this one of the strongest corner joints available. It also has a striking visual appearance that many woodworkers use deliberately as a design feature.
Consistent spacing is essential — the cuts must be evenly spaced and accurately sized for the joint to fit together cleanly. A box joint jig fitted to your table saw or router table makes this achievable for beginners. Without a jig, consistent hand-cut finger joints are very difficult to achieve.
Best for: tool boxes, storage boxes, drawers, decorative casework.
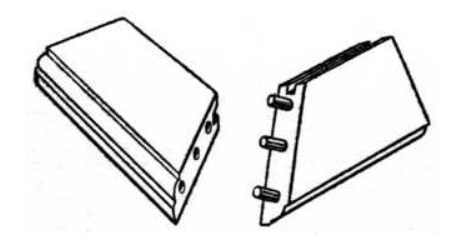
7. Dovetail joints
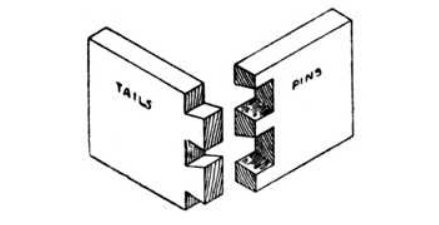
Dovetail joints are where function meets beauty. The interlocking trapezoidal pins and tails create a joint that is mechanically resistant to being pulled apart — making it the traditional choice for drawer construction, where the joint is constantly subjected to outward pulling forces.
Dovetails can be cut by hand or with a dovetail jig and router. Hand-cut dovetails are a significant skill milestone — they require practice to get right, but the result is a joint that showcases real craftsmanship. Start with a jig if you want reliable results quickly. Move to hand-cutting once you’ve built confidence with the other intermediate joints.
Best for: drawer boxes, blanket chests, fine cabinetry, decorative joinery.
8. Pocket hole joinery
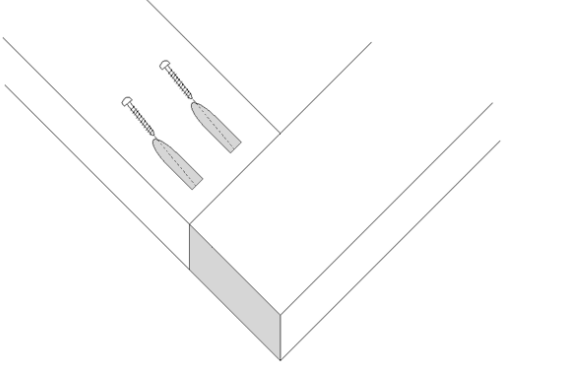
Pocket hole joinery is the fastest and most accessible of the intermediate techniques. An angled hole is drilled into one piece using a pocket hole jig, then a special screw drives through that hole and into the adjoining piece. The result is a strong, hidden joint that requires no clamping time — the screw holds everything together immediately.
Pocket hole joinery won’t win any awards for traditional craftsmanship, but it’s extraordinarily practical for cabinet frames, furniture carcasses, and any situation where speed and hidden assembly matter more than aesthetics. The Kreg Jig is the most popular tool for this technique and is widely available. For more on the tools that make joinery like this achievable, read our guide to essential woodworking tools every beginner needs.
Best for: cabinet frames, face frames, furniture carcasses, hidden structural joints.
Troubleshooting and perfecting your joinery technique
Even with the right tools and the right method, joinery takes practice to get consistently right. These are the most common issues you’ll encounter when practising joinery techniques for beginners.
Joints that don’t fit together cleanly
If a joint is too tight, identify where the binding is occurring — rub a pencil across the mating surfaces and press the joint together; the pencil marks will transfer to the high spots that need paring back. Work carefully with a sharp chisel, removing small amounts at a time. Never force a joint — you’ll split the wood.
If a joint is too loose, the options are more limited. For small gaps, a mixture of wood glue and fine sawdust can fill minor voids. For larger gaps, it’s usually better to recut the joint from fresh material.
For video demonstrations of each joint being cut, the Wood Whisperer has an excellent free library of joinery technique tutorials.
Mastering the glue-up
Clamping and gluing is where many beginners lose the quality they worked hard to achieve during cutting. Here’s how to do it right:
Apply a consistent, thin layer of wood glue to both mating surfaces — not just one. Too much glue creates a mess and can actually weaken the joint by preventing the surfaces from making full contact. Too little starves the joint. The right amount produces a small, even bead of squeeze-out around the joint line when clamped.
Always dry-fit your joints before applying glue — clamp the piece together without glue to confirm everything lines up correctly and that you have enough clamps. Discovering a problem during glue-up, with a clock ticking on the open time of the glue, is avoidable with a quick dry run.
Cleaning up squeeze-out
When you clamp a glued joint, a small bead of glue should squeeze out around the joint line. Don’t ignore this. Either wipe it away immediately with a slightly damp cloth — before it skins over — or wait for it to reach a rubbery, gel-like consistency and slice it off cleanly with a sharp chisel. Dried glue under a finish looks unprofessional and is difficult to remove.
Clamping correctly
Use enough clamps to apply even pressure across the full length of the joint. Clamp pressure should be sufficient to close any visible gaps, but not so aggressive that you bow the wood or squeeze all the glue out. Check for square immediately after clamping — measure the diagonals of any frame or box to confirm they’re equal. Correct any racking before the glue sets.
How joinery connects to everything else in woodworking
Joinery techniques for beginners don’t exist in isolation — they connect directly to your understanding of wood grain, timber selection, and finishing. Knowing how grain direction affects joint strength, for example, helps you orient pieces for maximum durability. Knowing which timber species are easier to chisel guides your material choices for joinery-heavy projects. Putting joinery techniques for beginners into regular practice is the fastest way to build real woodworking skill.
For a solid understanding of how wood grain affects your joinery decisions, read our guide to understanding wood grain. And for choosing the right timber species before you start cutting, our guide to the best wood for beginner woodworking projects covers everything you need to know.
If you’re looking for projects that put these joinery techniques to work, our Ted’s Woodworking review covers a plan library of over 16,000 projects — each with detailed joinery instructions, materials lists, and cutting diagrams.